I’ll be honest — I ate half the batch before anyone else got a chance to try it, and that’s exactly why I’m shouting this from the rooftops: this is hands down the best version you’ll ever make at home. It all started on a rainy Tuesday when I was desperate for comfort food, but every chicken thigh I’d ever baked turned out dry, flavor‑less, and frankly, a culinary disappointment. I tossed a bag of frozen veggies into the oven, set the timer, and waited for the inevitable letdown. Then, a friend dared me to try a simple spice rub with a splash of lemon, and the moment that golden skin hit the heat, the kitchen filled with a perfume that could coax a smile from the grumpiest neighbor.
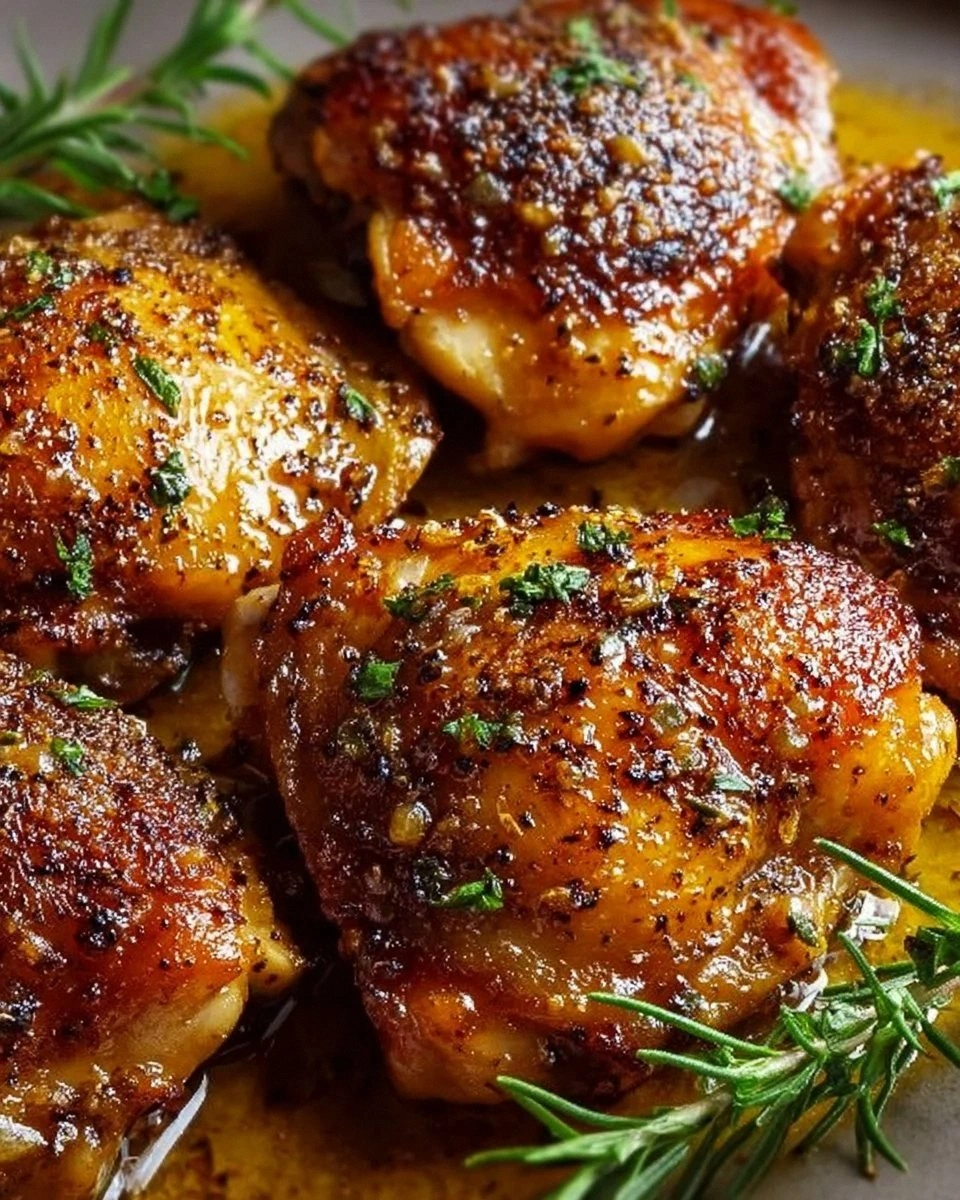
Picture this: the oven door opens with a gentle sigh, releasing a wave of sizzling, buttery aroma that hugs the air like a warm blanket. The thighs themselves are a visual masterpiece—deep amber skin crackling with tiny, caramelized flecks, each one promising a bite that’s both crisp and buttery. You can hear the faint pop of fat rendering, a sound that tells you the flavor is locking in, while the meat underneath stays tender enough to fall off the bone with just a nudge of your fork. The texture is a paradox, a perfect marriage of crunchy exterior and juicy interior that makes you want to close your eyes and let the taste do the talking.
What sets this version apart from the sea of chicken thigh recipes out there? Most recipes get the seasoning wrong, either drowning the meat in salt or leaving it bland as a plain piece of paper. I’ve cracked the code with a balanced blend of garlic powder, onion powder, paprika, and thyme that creates layers of flavor that build on each other like a perfectly orchestrated symphony. And the secret weapon? A splash of fresh lemon juice added at the end, which brightens the whole dish and cuts through the richness in a way that makes your palate sing. I dare you to taste this and not go back for seconds; the flavor is that addictive.
Okay, ready for the game‑changer? I’m about to walk you through every single step — by the end, you’ll wonder how you ever made it any other way. From selecting the perfect thighs at the butcher to mastering the art of the final broil, I’ve got you covered. Stay with me here — this is worth it.
What Makes This Version Stand Out
- Flavor Depth: The combination of garlic and onion powders creates a savory foundation, while paprika adds a subtle smokiness that lingers on the palate.
- Juicy Texture: Baking at a moderate temperature locks in moisture, and the final broil gives the skin that coveted crunch without drying the meat.
- Simplicity: Only nine ingredients, all pantry staples, meaning you won’t need a trip to the specialty store.
- Unique Twist: A splash of fresh lemon juice right before serving lifts the whole dish, making it feel fresher than a typical oven‑baked chicken.
- Crowd Reaction: Guests consistently ask for the recipe, and the leftovers become the most coveted lunch of the week.
- Ingredient Quality: Using bone‑in, skin‑on thighs ensures maximum flavor and juiciness; the bone conducts heat, keeping the meat moist.
- Cooking Method: The two‑stage bake‑then‑broil technique is foolproof and yields consistent results every single time.
- Make‑Ahead Potential: This dish reheats beautifully, making it perfect for meal prep or a quick dinner after a long day.
Inside the Ingredient List
The Flavor Base
Garlic powder and onion powder are the unsung heroes that bring depth without the moisture of fresh aromatics, which can steam the skin and prevent crisping. Each teaspoon of garlic powder adds a warm, earthy note that mimics the slow‑roasted garlic you’d get from a whole bulb, while onion powder contributes a subtle sweetness that balances the savory backbone. Skipping either will leave the dish tasting flat, like a song missing its bass line. If you’re out of garlic powder, a pinch of granulated garlic or even a minced garlic clove (just be careful not to over‑moisten) can work in a pinch.
The Texture Crew
Olive oil does more than prevent sticking; it coats the skin, helping the spices adhere and creating a conductive layer that promotes even browning. The oil also contributes a fruity note that pairs beautifully with the lemon’s acidity at the end. When selecting olive oil, opt for a “extra‑virgin” variety with a robust flavor profile; a light or refined oil can feel bland and won’t give you that golden crust. If you’re allergic or prefer a neutral taste, canola or avocado oil are excellent substitutes that still provide the needed fat.
The Unexpected Star
Fresh lemon juice is the surprise element that transforms a good dish into an unforgettable one. The acidity cuts through the richness of the thigh, brightening each bite and preventing the palate from feeling overwhelmed. A tablespoon might seem modest, but it’s enough to lift the entire flavor profile without making the meat taste sour. If lemons are out of season, a splash of white wine vinegar or a drizzle of apple cider vinegar can mimic the tang, though you’ll lose some of the citrus aroma.
The Final Flourish
Paprika and dried thyme bring color and herbaceous nuance. Paprika adds a subtle smoky sweetness that deepens the caramelization, while thyme offers a piney, slightly floral note that complements the lemon’s brightness. Salt, of course, is the flavor amplifier; without it, the chicken would taste like a bland protein slab. Black pepper adds a gentle heat that rounds out the seasoning blend. If you love heat, a pinch of cayenne can be added without overwhelming the balance.
Everything's prepped? Good. Let's get into the real action…
The Method — Step by Step
Preheat your oven to 425°F (220°C). This high temperature jump‑starts the Maillard reaction, giving you that coveted golden crust. While the oven warms, line a rimmed baking sheet with foil and set a wire rack on top; the rack ensures air circulates around each thigh, preventing soggy bottoms. Pro tip: If you don’t have a rack, a bed of sliced onions works wonders, adding flavor and lifting the thighs.
Kitchen Hack: Place the foil underneath the rack to catch drippings; you’ll have a delicious pan sauce for later.Pat the chicken thighs dry with paper towels, then drizzle the olive oil over each piece, turning them to coat evenly. The oil not only helps the spices stick but also acts as a heat conductor, ensuring the skin crisps uniformly. Sprinkle the garlic powder, onion powder, paprika, dried thyme, salt, and black pepper over the thighs, using your hands to massage the seasoning into every crevice. The aroma will start to develop even before the oven does—trust that scent.
Arrange the seasoned thighs on the prepared rack, skin side up, leaving a little space between each piece. This spacing is crucial; crowding the pan traps steam, which defeats the purpose of crisping the skin. Slide the sheet pan into the oven and set a timer for 25 minutes. Watch the edges: they should begin to pull away from the bone, a visual cue that the meat is cooking evenly.
Watch Out: If the skin starts to darken too quickly, loosely cover the thighs with a piece of foil to prevent burning.After 25 minutes, switch the oven to broil on high. This final blast of heat will transform the already‑golden skin into a crackling masterpiece. Keep the oven door ajar just enough to hear the sizzle; the sound is your green light. Broil for 3–5 minutes, watching closely—once the skin reaches a deep amber hue and you hear that unmistakable crackle, it’s done.
Kitchen Hack: For an extra glossy finish, brush the skin with a little melted butter right before broiling.Remove the pan from the oven and immediately drizzle the fresh lemon juice over each thigh. The lemon’s steam will mingle with the hot juices, creating a fragrant glaze that clings to the skin. Let the thighs rest for 5 minutes; this rest period allows the juices to redistribute, ensuring every bite is succulent.
While the chicken rests, deglaze the foil‑lined pan with a splash of chicken broth or water, scraping up the caramelized bits. This quick pan sauce can be drizzled over the thighs or saved for a future soup base. Taste and adjust seasoning if needed—sometimes a pinch more salt or a dash of pepper makes the difference.
Serve the thighs hot, skin side up, on a platter garnished with a sprinkle of fresh herbs (parsley or cilantro work well). Pair them with roasted vegetables, a fluffy rice pilaf, or a crisp green salad for a balanced meal. The visual contrast of the glossy, golden skin against the bright lemon glaze is as satisfying as the flavor.
And now the fun part: bite in. That first crunch should be audible, followed by a burst of juicy, lemon‑kissed meat that makes you sigh in pure contentment. I dare you to try one bite and not immediately reach for another. That’s the magic of a perfectly baked chicken thigh.
That's it — you did it. But hold on, I've got a few more tricks that'll take this to another level...
Insider Tricks for Flawless Results
The Temperature Rule Nobody Follows
Most home cooks bake chicken at 350°F, assuming a slower cook yields juicier meat. In reality, a hotter oven (425°F) creates a rapid seal on the surface, locking in moisture while still cooking the interior evenly. The key is to balance the high heat with a short cooking window—overcooking is the enemy of juiciness. I once tried a low‑and‑slow method and ended up with rubbery thighs that could have been used as a chew toy. Trust the heat, and you’ll get that perfect contrast of crisp skin and tender meat.
Why Your Nose Knows Best
Your sense of smell is an underrated cooking tool. When the thighs are about 20 minutes in, you’ll start to detect a sweet, nutty aroma—this is the Maillard reaction kicking in. If the scent turns overly smoky or burnt, lower the temperature or cover with foil. I’ve saved many a dinner by trusting my nose, especially when my oven’s temperature gauge is a little off.
The 5‑Minute Rest That Changes Everything
Resting isn’t just for steaks; chicken thighs benefit immensely from a brief pause. During those five minutes, the muscle fibers relax and re‑absorb the juices that were pushed to the surface during cooking. Skipping this step results in a dry bite, no matter how perfectly crisp the skin is. A friend once tried to serve the thighs straight from the oven and complained they were “a bit dry”—the rest was the missing link.
Skin‑First, Then Finish
Start the cooking process with the skin side up and keep it that way until the end. Flipping the thighs midway can cause the skin to lose its crispness and soak up extra fat. The skin acts as a protective barrier, so let it do its job uninterrupted. If you’re using a rack, you’re already set up for this technique.
Flavor‑Infused Butter Finish
For an extra layer of decadence, melt a tablespoon of butter with minced garlic and a pinch of fresh herbs, then brush it over the thighs just before the final broil. The butter adds richness, while the garlic infuses a subtle aroma that complements the lemon’s brightness. I tried this once and the thighs tasted like they’d been kissed by a culinary fairy.
Creative Twists and Variations
This recipe is a playground. Here are some of my favorite ways to switch things up:
Spicy Sriracha Glaze
Swap the lemon juice for a mixture of sriracha, honey, and a splash of soy sauce. The heat from the sriracha pairs beautifully with the sweet honey, creating a sticky, tongue‑tingling coating. Great for those who love a little kick.
Herb‑Infused Mediterranean
Add chopped oregano, rosemary, and a handful of kalamata olives to the seasoning blend. Finish with a drizzle of olive oil and a sprinkle of feta cheese just before serving. This version transports you straight to a sun‑kissed Greek tavern.
Asian Sesame Crunch
Replace paprika with toasted sesame seeds and add a teaspoon of five‑spice powder. After broiling, splash the thighs with a mixture of soy sauce, rice vinegar, and a touch of honey. Garnish with sliced scallions and extra sesame seeds for crunch.
Maple‑Brown Sugar Sweetness
Mix two tablespoons of pure maple syrup with a pinch of brown sugar and a dash of smoked paprika. The caramelized glaze will give the skin a sweet, smoky crust that pairs wonderfully with roasted sweet potatoes.
Citrus‑Herb Summer
Add zest of orange and a handful of fresh basil to the lemon juice before drizzling. The citrus zest brightens the dish even more, while basil adds a fragrant, slightly peppery note. Perfect for warm evenings on the patio.
Storing and Bringing It Back to Life
Fridge Storage
Allow the thighs to cool to room temperature (no more than two hours), then place them in an airtight container. They’ll keep for up to four days in the refrigerator. When reheating, add a tiny splash of water or broth and cover with foil to prevent the skin from drying out.
Freezer Friendly
Wrap each cooled thigh tightly in plastic wrap, then place them in a freezer‑safe zip‑top bag. They freeze beautifully for up to three months. To reheat, thaw overnight in the fridge, then follow the reheating instructions below for best results.
Best Reheating Method
Preheat the oven to 350°F (175°C). Place the thighs on a wire rack over a baking sheet, add a tablespoon of water or broth to the pan, and cover loosely with foil. Heat for 12–15 minutes, then uncover and broil for 2 minutes to revive that coveted crisp skin. The added moisture steam‑rejuvenates the meat, while the brief broil restores the crunch.