I was standing in my kitchen on a rainy Tuesday, staring at a half‑empty pantry, when a dare from my roommate hit me like a bolt of lightning: “Make something that tastes like a candy bar but doesn’t need an oven.” I laughed, I shrugged, and then I reached for the lone Butterfinger bar that had been lurking behind the cereal. The moment I snapped that crunchy, peanut‑butter‑coated chocolate into pieces, I knew I was onto something. The scent of caramelized sugar and toasted peanuts filled the room, the kind of aroma that makes your stomach do a little happy dance and your mind start planning the perfect Instagram caption before you even finish the first bite.
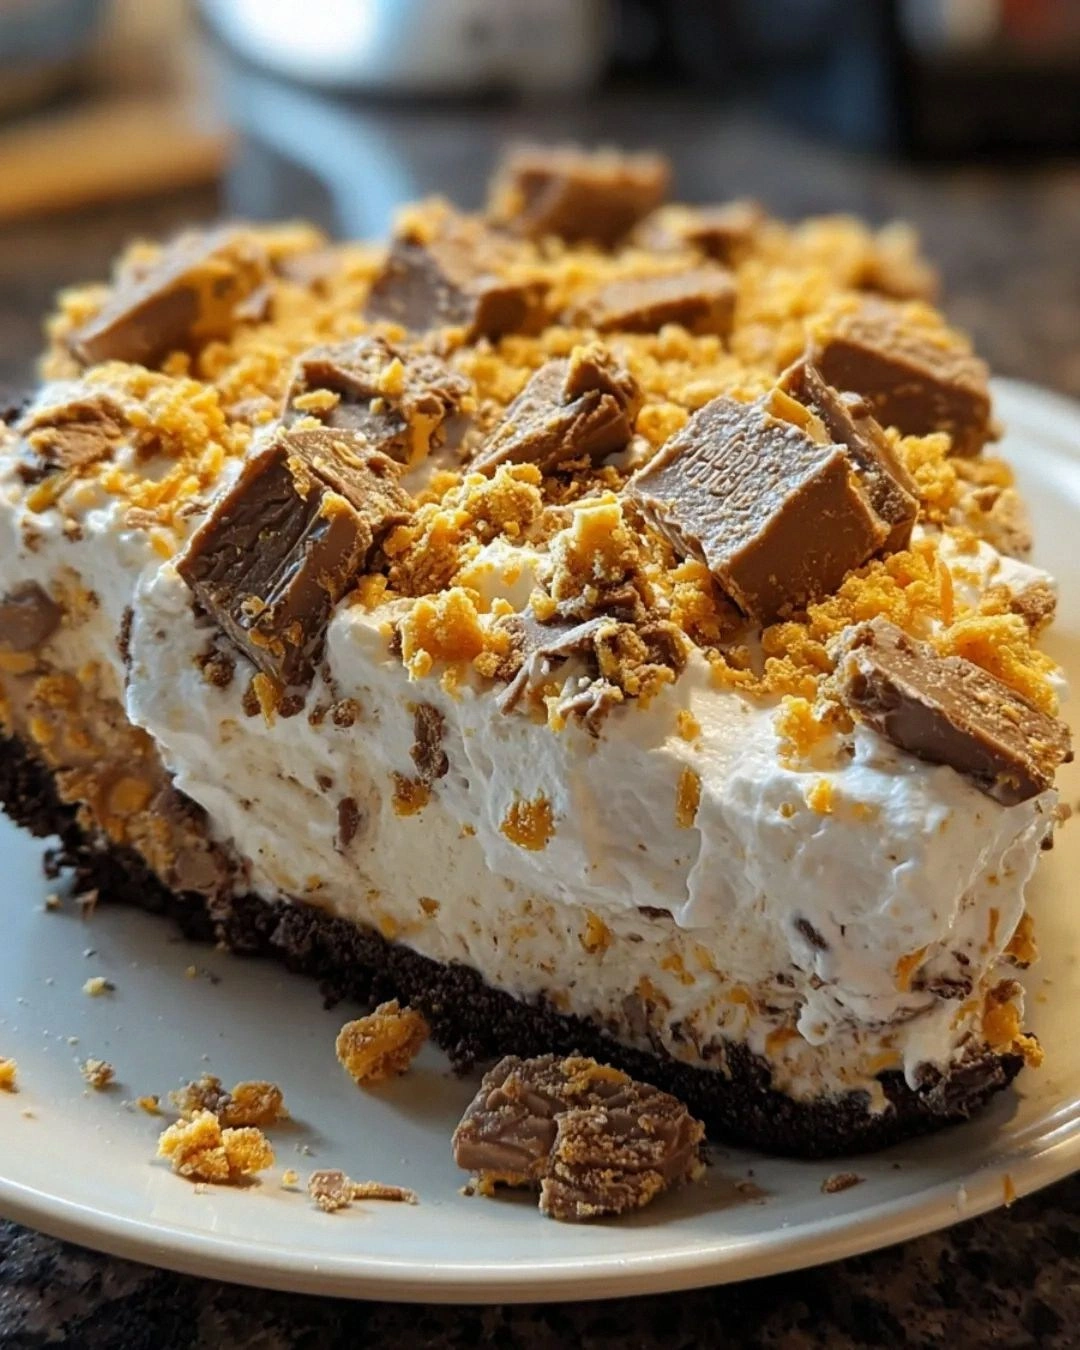
Fast forward a few frantic experiments, and I finally nailed a version that feels like a dream you can actually eat. Imagine a buttery, crumbly crust that shatters like a glass‑smooth ice cube, a silky filling that coats your tongue like velvet, and a glossy chocolate‑butterfinger swirl that glistens like a midnight lake. The texture contrast is insane – you get that satisfying snap from the candy, a creamy melt‑in‑your‑mouth layer, and a light, airy topping that whispers “I’m not a cake, I’m a miracle.” This is hands down the best version you’ll ever make at home, and I’m about to spill every secret that makes it sing.
Most recipes get this completely wrong. They either drown the buttery crunch in a sea of chocolate, or they forget the crucial step of letting the crust set properly, resulting in a soggy mess that no one wants to touch. I’ve been there – a soggy bottom that turned my dessert into a sad, mushy pancake. But this version respects each component, letting the flavors shine without stepping on each other’s toes. The secret? A tiny dash of sea salt that amplifies the caramel notes, and a quick chill that locks everything in place, giving you a slice that holds together like a perfectly engineered skyscraper.
Okay, ready for the game‑changer? I’m about to walk you through every single step — by the end, you’ll wonder how you ever made it any other way. I dare you to taste this and not go back for seconds. Picture yourself pulling this out of the fridge, the whole kitchen smelling like a candy shop on a sugar high, and the first bite delivering a chorus of textures that make you want to shout, “I’m never buying store‑bought Butterfinger Pie again!” Stay with me here — this is worth it.
What Makes This Version Stand Out
- Texture: The crust is buttery and crisp, the filling is creamy yet firm, and the topping adds a light, airy finish that makes every forkful feel like a celebration.
- Flavor: A perfect balance of chocolate, peanut butter, and caramel, amplified by a pinch of sea salt that turns sweet into sensational.
- Simplicity: No oven, no complicated equipment – just a few bowls, a whisk, and a fridge. If you can melt chocolate, you can make this.
- Uniqueness: The use of real Butterfinger pieces (not the generic “candy bar” substitute) gives authentic crunch and that unmistakable buttery‑peanut flavor.
- Crowd Reaction: Guests will stare, sniff, and then dive in, often proclaiming it the best dessert they’ve ever tasted at a potluck.
- Ingredient Quality: High‑quality dark chocolate and fresh cream cheese create a richer mouthfeel than most boxed mixes.
- Method: The no‑bake approach preserves the delicate candy texture and saves you from heating up the kitchen.
- Make‑Ahead Potential: This pie can sit in the fridge for up to 48 hours, getting even more flavorful as the layers meld.
Inside the Ingredient List
The Flavor Base
The foundation of any great dessert is its flavor base, and here it starts with crushed chocolate sandwich cookies and melted butter. The cookies provide a deep cocoa backbone, while the butter adds richness that binds everything together. If you skip the butter or use a low‑fat alternative, the crust will crumble apart like dry sand on a windy day. For a gluten‑free twist, substitute the cookies with gluten‑free chocolate wafers – the taste stays intact, the texture changes just enough to keep it interesting.
The Texture Crew
Cream cheese and heavy whipping cream are the dynamic duo that give this pie its velvety body. The cream cheese offers a subtle tang that cuts through the sweetness, while the whipped cream lightens the mixture, preventing it from feeling heavy. If you’re dairy‑intolerant, try a blend of coconut cream and a dairy‑free cream cheese – you’ll still get that luxurious mouthfeel, though the flavor profile will shift toward a tropical hint.
The Unexpected Star
Butterfinger candy bars are the hero of this recipe. Their crunchy peanut‑butter core and caramel‑coated chocolate shards deliver that signature snap and salty‑sweet punch. Crushing them too fine turns them into a paste, losing the delightful crunch; keep some larger pieces for texture contrast. If you can’t find Butterfinger, try a combination of peanut butter cups and caramel candies – you’ll still hit the sweet‑salty sweet spot.
The Final Flourish
A glossy chocolate ganache draped over the top adds a luxurious sheen and a final layer of chocolate intensity. Made with just dark chocolate and a splash of heavy cream, it sets to a firm but melt‑in‑your‑mouth finish. For a twist, swap the dark chocolate for milk chocolate for a sweeter glaze, or add a pinch of espresso powder to deepen the cocoa notes. A final dollop of whipped topping crowns the pie, giving it a cloud‑like softness that balances the richness below.
Everything's prepped? Good. Let's get into the real action…
The Method — Step by Step
First, crush the chocolate sandwich cookies into fine crumbs. I like to use a zip‑top bag and a rolling pin – it’s messier but gives you control over the size. Once you’ve achieved a texture that feels like sand with a few tiny pebbles, transfer the crumbs to a medium bowl. Add the melted butter, stirring until every crumb is glossy and clings together when pressed between your fingers. This is the moment of truth: the mixture should hold together without crumbling when you press it into the pan.
Press the crumb‑butter mixture into the bottom and up the sides of a 9‑inch springform pan. Use the back of a measuring cup to smooth it out, pressing firmly so you create a solid base. Kitchen Hack: Chill the crust for 10 minutes while you prepare the filling; this firms it up and prevents cracks later. I dare you to skip this step – you’ll end up with a crust that slides off like a bad dance partner.
While the crust chills, whisk together the softened cream cheese, granulated sugar, and vanilla extract in a large mixing bowl. The mixture should become light and fluffy, a sign that air is being incorporated – this is what gives the filling its lift. Add the heavy whipping cream gradually, whisking continuously until the mixture thickens and holds soft peaks. If you notice the mixture looks too runny, keep whisking a minute longer; it will thicken as the cream incorporates air.
Fold in the chopped Butterfinger pieces, reserving a handful for garnish. The candy should be evenly distributed, creating pockets of crunchy surprise in every bite. Watch Out: Over‑mixing at this stage can cause the Butterfinger shards to break down into mush, losing that coveted snap. Gentle folding is the key – think of it as coaxing the candy into the cream, not wrestling with it.
Pour the creamy filling over the chilled crust, smoothing the top with an offset spatula. The filling should sit level and glossy, not wobbling like jelly. Place the pan back in the fridge for another 15 minutes while you prepare the ganache. This short chill helps the filling set just enough so the ganache won’t seep through the crust.
For the ganache, heat ¼ cup of heavy cream in a small saucepan until it just begins to simmer – you’ll see tiny bubbles forming at the edges. Remove from heat and pour over 4 oz of chopped dark chocolate, letting it sit for 2 minutes before stirring until silky smooth. Kitchen Hack: If you want a glossy finish, add a teaspoon of corn syrup; it prevents the ganache from developing a dull film as it cools.
Drizzle the ganache over the set filling, using a spoon to create a swirl pattern. The ganache should be thick enough to hold its shape but fluid enough to spread – if it’s too thick, gently warm it for 10 seconds in the microwave. Sprinkle the reserved Butterfinger pieces on top, letting them peek through the chocolate like hidden treasures.
Top the pie with a generous layer of whipped topping, spreading it to the edges. This airy crown adds a light contrast to the dense filling beneath. Finally, chill the entire pie for at least 30 minutes, preferably an hour, to let all layers meld into a cohesive masterpiece. The moment you lift the springform ring, you’ll see clean, defined edges – a visual promise of the perfect slice to come.
When you’re ready to serve, run a thin knife under hot water, wipe dry, and slice. Each piece should hold together, showcasing the buttery crust, creamy center, and glossy ganache with those glorious Butterfinger shards glimmering on top. This next part? Pure magic. Serve immediately or keep refrigerated until guests arrive – the pie stays fresh for up to two days.
That's it — you did it. But hold on, I've got a few more tricks that'll take this to another level…
Insider Tricks for Flawless Results
The Temperature Rule Nobody Follows
Never let your cream cheese sit at room temperature for more than 15 minutes before mixing. If it’s too warm, it will create pockets of water in the filling, making it runny. Keep the cream cheese in the fridge until just a few minutes before you start whisking, then give it a quick 30‑second microwave zap (10% power) to soften it without melting. This ensures a smooth, lump‑free base that holds its shape after chilling.
Why Your Nose Knows Best
When you whisk the cream cheese mixture, pay attention to the aroma. As soon as you smell a faint buttery scent and the mixture looks glossy, you’re close to the perfect consistency. If the scent still feels “raw,” keep whisking a little longer. Your nose is a better indicator than a timer because it senses the subtle chemical changes that happen as air is incorporated.
The 5‑Minute Rest That Changes Everything
After you pour the filling into the crust, give it a 5‑minute pause before adding the ganache. This short rest allows the crust to absorb a tiny bit of moisture from the filling, creating a seamless bond that prevents the ganache from sliding off. I once tried to skip this rest and ended up with a ganache that pooled at the edges – a disaster for presentation.
The Secret of the Salted Edge
Just before you drizzle the ganache, sprinkle a pinch of flaky sea salt along the outer rim of the pie. The salt crystals create a tiny burst of flavor that cuts through the sweetness and makes each bite feel balanced. It’s a pro trick used in high‑end pastry kitchens and it works wonders on this candy‑centric dessert.
The Chill‑Flip Technique
When you finally remove the springform ring, do it over a chilled plate. The cold surface helps the crust retain its shape and prevents the ganache from sliding. If you’re serving on a warm platter, the ganache can soften too quickly, turning the slice into a sticky mess.
Creative Twists and Variations
This recipe is a playground. Here are some of my favorite ways to switch things up:
Nutty Crunch Delight
Swap half of the Butterfinger pieces for toasted chopped peanuts. The extra nutty bite adds depth and makes the pie feel more “grown‑up.” It’s perfect for those who love a little extra texture beyond the candy’s caramel shell.
Mocha Madness
Add a tablespoon of instant espresso powder to the ganache and replace half of the dark chocolate with milk chocolate. The result is a coffee‑infused chocolate glaze that pairs beautifully with the peanut butter notes, creating a sophisticated flavor profile.
White Chocolate Raspberry
Replace the dark chocolate ganache with a white chocolate and raspberry coulis swirl. The bright tartness of raspberry cuts through the sweetness, while the white chocolate adds a buttery smoothness that feels like a summer romance.
Vegan Velvet
Use a plant‑based cream cheese alternative, coconut cream, and dairy‑free chocolate. Substitute the butter in the crust with coconut oil. The texture remains indulgent, and the flavor shifts to a tropical vibe that surprises even the most skeptical carnivores.
Spiced Autumn
Add a pinch of cinnamon and a dash of pumpkin spice to the cream cheese mixture. Pair it with a drizzle of caramel sauce instead of ganache. This version is perfect for a cozy fall gathering, turning the candy bar into a warm, comforting treat.
Storing and Bringing It Back to Life
Fridge Storage
Cover the pie tightly with plastic wrap or a reusable silicone lid and store it in the refrigerator. It will stay fresh for up to 48 hours. The chilled environment keeps the ganache firm and the crust crisp, so each slice feels as good as the first.
Freezer Friendly
If you need to make it ahead, freeze the pie (uncovered) for up to 2 weeks. When you’re ready to serve, transfer it to the fridge to thaw overnight, then add a fresh dollop of whipped topping. The ganache may become slightly grainy after freezing, but a quick 10‑second microwave melt and stir restores its shine.
Best Reheating Method
While this pie is best served cold, if you crave a warm dessert, microwave a single slice for 8‑10 seconds. Add a tiny splash of milk or water before heating – it creates steam that revives the ganache and prevents the crust from drying out. The result is a gooey, molten bite that feels like a warm hug.